Disclosure: This post may contain affiliate links. I may earn a small commission for my endorsement, recommendation, testimonial, and/or link to any products or services from this website.
Preserve the best of summer’s bounty to enjoy all year long with this blueberry jam without pectin! The easy homemade spread is perfect on toast, stirred into yogurt, spooned over ice cream, dolloped on pancakes, or shared with friends for the holidays.

Table of Contents
If you love homemade jam recipes, be sure to try this blackberry jam, a batch of cherry jam, this Christmas jam, some easy freezer strawberry jam, and our favorite fig preserves, too!
Why You’ll Love this Recipe
- Small Batch. The recipe yields three jars of jam, which means that you don’t need to spend hours picking fresh fruit and you don’t have to spend a fortune on fresh berries at the market. With just 2 pounds of fruit, you can process the blueberry jam in about an hour.
- Quick and Easy. The simple process only requires about 20 minutes on the stovetop. If you choose to process and can the jam, that step is quick as well, since you’re only working with three jars. You’re not looking at an entire afternoon in the kitchen while you wait for batch after batch of jars in the water bath. I’ve been there, done that, and it’s not always my preference!
- No Pectin. Since blueberries are high in natural pectin, you can prepare the jam without using additional pectin. Skip an extra trip to the grocery store!

Ingredients
This is an overview of the ingredients that you’ll need for a batch of homemade blueberry jam without pectin. As always, specific measurements and step-by-step instructions are included in the printable recipe box at the bottom of the post.
- Fresh blueberries: you’ll need 2 pounds total, which comes out to about 6 cups of fresh berries (maybe slightly more). When making jam, it’s always best to weigh your fruit to make sure that you have the exact amount — otherwise it could impact your jam’s ability to set. Use fresh, ripe blueberries for this recipe (not dried blueberries or frozen blueberries). Fresh berries have the best acidity and tannins to give the jam a more complex flavor, and the skins are the proper texture. Frozen blueberries tend to be mushier and more watery than fresh fruit when thawed, which will likely alter the consistency of your jam. This recipe will also work with blackberries and raspberries (or a combination).
- Granulated sugar: to sweeten the jam and help it set.
- Lemon juice: the acid in lemon juice lowers the pH level in the jam, which neutralizes negative charges on the strands of pectin and therefore helps the jam set. Use fresh lemon juice or bottled lemon juice — whichever you have on hand.

Equipment Needed
- 3 sterilized half-pint mason jars and lids: this blueberry jam recipe yields enough for about 3 (8-ounce) jars. I like the half-pint jars because it’s just the right amount of jam to keep in the fridge after it’s opened, but smaller 4-ounce jars are also a great option (you’ll need 6-7 of those).
- A sterilized funnel: this tool makes it easier to get the jam inside the jar without spilling; however, it’s fine if you don’t have a funnel — you can carefully spoon the jam into the jars instead.
- Tongs: canning tongs are incredibly helpful when taking the jars in and out of the hot water.
- Saucepan or enamel-coated Dutch oven: for cooking the jam. Allow plenty of room for the mixture to boil, bubble, and foam. I often use my 7 1/4-quart cast iron Dutch oven for these purposes.
- Wooden spoon or silicone spatula: to stir, stir, stir!
- Canner or large pot for boiling jars: this needs to be very deep so that you can cover the jars with at least 1-2 inches of water. I use the pot and rack from my pressure canner, but a deep stock pot also works fine.


How to Sterilize Jars and Lids for Jam
It’s a good practice to sterilize the jars and lids before canning in order to kill any bacteria, fungi, or yeast. There are a variety of ways to sterilize the jars (here’s a helpful article with different options). I typically use the dishwasher, or just boil them for 10 minutes in the same big pot of water that I’ll use for processing.

Directions
This recipe is incredibly simple — it’s just important to get all of your ingredients and equipment prepared in advance because the process moves quickly. In less than an hour, you can have jars of old-fashioned blueberry jam canned and ready for the pantry. There’s nothing more satisfying than hearing that “pop” as the lids seal!
- Crush the Blueberries. I use a potato masher to squish my berries, but you can also pulse a few times in a food processor if that’s easier. Just don’t puree the fruit — you want some texture to the berries since they will continue to cook down on the stovetop.
- Combine Blueberries, Sugar, and Lemon Juice. Stir together the crushed blueberries, sugar, and lemon juice in a large Dutch oven or saucepan.
- Boil. Gradually bring the blueberry mixture to a boil, stirring constantly. Increase the heat, and cook until the mixture reaches 220°F on a candy thermometer or deep-fry thermometer. The cooking time will likely be 10-15 minutes.
- Fill Jars. Remove the berries from the heat, skim off the foam, and quickly ladle the jam into hot jars. Leave about ¼-inch headspace in each jar. The proper amount of headspace in a jar is important to ensure a vacuum seal. If there’s too little headspace, the jam may expand and bubble out when air is being forced out from under the lid during processing. Add the lids and rings.
- Process Jars in Boiling Water. Set the hot jars on a rack in a canner or in a hot water bath. Boil for 10 minutes. This water-bath canning gives the jam a shelf life of at least 8-12 months, so it’s well worth the effort!
- Cool. The jam will not set immediately, so it’s important to allow the jars to rest without interruption at room temperature until cool (or overnight). It can take 24-48 hours for a batch of jam to finish setting up. Patience is key!

Storage Tips
Once the jam has had a chance to cool, check the seals. The lids should be down in the center or should stay down when pressed. Unsealed jars or unprocessed jars of fresh blueberry jam should be refrigerated and used within 3 weeks. Store properly sealed and processed jars of blueberry jam in a cool, dark, dry place (such as a pantry) for up to 8 months. It’s a great way to hold onto the sweetness of blueberry season!
I do not recommend freezing this homemade jam. Use a blueberry freezer jam recipe if you prefer that method.

More Recipes with Blueberries

Blueberry Bread
2 hours hrs 10 minutes mins
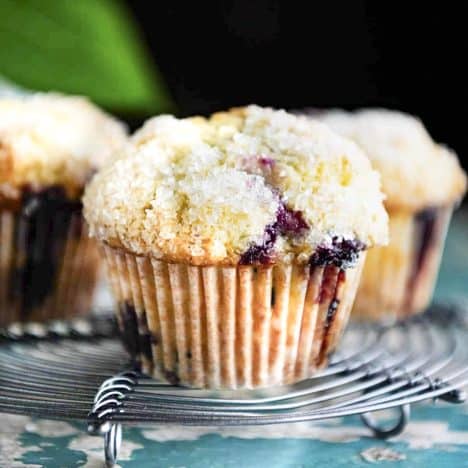
Sour Cream Blueberry Muffins
35 minutes mins
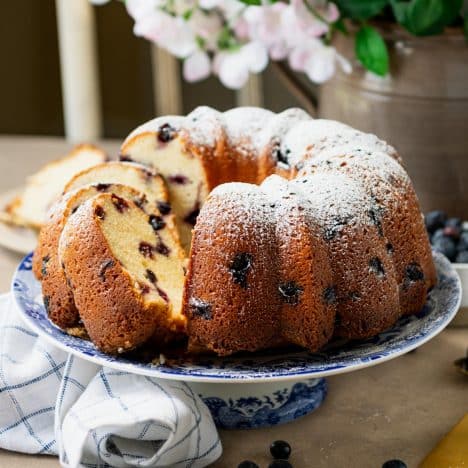
Southern Blueberry Pound Cake
4 hours hrs 20 minutes mins

Blueberry Jam without Pectin
Ingredients
- 2 lbs. (about 6 cups) fresh blueberries
- 2 cups sugar
- 2 tablespoons lemon juice
- 3 half-pint jars and lids
Instructions
PREP
- Prepare home canning jars and lids according to manufacturer’s instructions for sterilized jars. Keep jars hot until filled. Always use new lids. Wash the berries and remove any stems. Place the berries in a large saucepan or enamel-coated Dutch oven. Coarsely crush the berries using a potato masher.


COOK
- Add the sugar and lemon juice to the crushed berries in the pot. Bring the mixture to a boil slowly over medium-low heat, stirring until the sugar dissolves. Increase the heat to medium-high and cook, stirring, until the mixture thickens and coats the back of a spoon (220 degrees F), about 10-15 minutes. Remove the pot from the heat. Skim off foam if necessary.

FILL
- Ladle the jam into hot sterilized jars, leaving ¼-inch of headspace at the top of each jar. Wipe the rims clean with a damp cloth. Secure the lids and adjust the bands to fingertip-tight.

PROCESS
- Process the jars in a water bath for 10 minutes.
- Carefully remove the jars to a towel on the counter. Let stand, undisturbed, for 12 hours at room temperature. Check the seals after 12 hours by pressing the center of the lids. If the lid gives or the center button remains popped up, store in the refrigerator for up to 1 month. Properly sealed jars will keep in a cool, dark place for up to 8 months. Refrigerate after opening.


Notes
- It’s a good practice to sterilize the jars and lids before canning in order to kill any bacteria, fungi, or yeast. There are a variety of ways to sterilize the jars (here’s a helpful article with different options). I typically use the dishwasher, or just boil them for 10 minutes in the same big pot of water that I’ll use for processing.
- Leave about ¼-inch of headspace in each jar. The proper amount of headspace in a jar is important to ensure a vacuum seal. If there’s too little headspace, the jam may expand and bubble out when air is being forced out from under the lid during processing.
- This recipe was updated in 2024 for a non-pectin jam. If you’re looking for the original recipe from 2020 that used pectin, I’ve included it below:
Nutrition
This recipe was originally published in June, 2020. It was updated in June, 2024.


Absolutely! Enjoy, Ranae! 🙂
Hi Blair – this was my very first attempt at canning and I just knew that your Blueberry Jam was going to be a winner – and I was so right! Oh my goodness! I followed your (helpful and precise) recipe directions to the ‘t’ and everything came our perfectly! The prettiest color, texture, and just right sweetness (yes I was skeptical about those 8 cups of sugar but you were right!) I am so excited to see all my small jam jars lined up so beautifully! Thank you so very much! I’ll be making many more batches!
That’s wonderful to hear, Wendy! Welcome to the world of canning. 🙂 It’s so satisfying, and I’m glad that it was a success for you!
Ohhhh my goodness! This recipe is such a delight! We went blueberry picking and I had your recipe in mind. Ended up picking 18 pounds of fresh blueberries! Came home and got to work. It’s so therapeutic to can, isn’t it? It brings me so much joy. Anyways, my 3-year-old absolutely LOVES this so much that he requested to eat it by itself in a bowl! LOL! Everyone in my family loves it! I’m picking up some more jars so that I can make another batch this weekend. LOL! So good! Thank you so much for a wonderful recipe!
Wow, that’s a lot of blueberries! So glad that the jam was a hit. Yes, my kids could eat it with a spoon, too. 🙂 Thanks for your note, Shelly!
When I made this recipe it turned out just like you said it would. I have had problems with other recipes and now yours is the only one I have kept.
Thank you so much, Keith!
Somewhat new to canning. Question about step 3. You say “Quickly ladle into the hot jars”. How do we keep the jars hot if they have already been sterilized?
Hi Kim,
Follow the instructions, and remove the jars from the hot water just before adding the jam. As long as you work quickly, they should stay warm enough! Here is a resource that might be helpful as well. Hope this helps.
Love the recipe.
Thank you so much, Bonnie!