Disclosure: This post may contain affiliate links. I may earn a small commission for my endorsement, recommendation, testimonial, and/or link to any products or services from this website.
Preserve fresh sweet cherries or sour cherries with this old-fashioned, easy cherry jam recipe! This classic spread is simple, full of sweet cherry flavor, and easy to can in shelf-stable jars. It’s the most delicious way to enjoy the season’s bounty all year long!

Table of Contents
If you love homemade jam recipes, don’t miss this strawberry freezer jam, a batch of Christmas jam, this easy blackberry jam (with or without pectin), and this homemade blueberry jam, too!
Why You’ll Love this Recipe
- Simple. This cherry jam recipe with pectin comes together with 4 basic ingredients. It’s sweet and flavorful, allowing the natural taste of the fresh cherries to truly shine.
- Shelf-Stable. Properly canning the jars allows you to store the jam at room temperature for up to 8 months. That means that you don’t have utilize valuable freezer space, and you can gift these jars of sweet summer goodness throughout the holiday season (when everyone loves a bright taste of the warmer weather months).
- Versatile. Spread the jam on a classic PB&J sandwich, or slather it on slices of Southern cornbread, on your morning toast, on scones, over pancakes, and on a buttermilk biscuit. It’s also great in desserts like these buttery jam thumbprint cookies or bowls of vanilla ice cream.

Ingredients
This is an overview of the simple ingredients that you’ll need for our favorite homemade cherry jam recipe. As always, specific measurements and step-by-step instructions are included in the printable recipe box at the bottom of the post.
- Fresh cherries: I use sweet cherries, but sour cherries will also work (just omit the lemon juice for sour cherry jam). Sweet cherry varieties that work well for jam include Bing cherries, black cherries, Montmorency, Stella, and Rainier cherries.
- Lemon juice: the acid in lemon juice lowers the pH level in the jam, which neutralizes negative charges on the strands of pectin and therefore helps the jam set. The acid in the lemon juice also enhances the flavor of the cherries and naturally preserves the jam by inhibiting bacterial growth. The jam does not actually taste like lemon. If you prefer a stronger lemon flavor, add a bit of lemon zest.
- Sugar: to sweeten the jam and help it set. I know that it might be tempting to play with the measurements and try to create a lower-sugar jam, but trust me: you need all of that sugar for this particular recipe. Stick with regular granulated sugar (instead of sugar substitutes like Splenda or stevia) and do not decrease the quantity called for in the recipe. Jam making is an exact science, so measuring the correct quantities of fruit, sugar, and lemon juice are essential to a successful batch.
- Liquid pectin: to thicken the jam and help it set. Do not substitute with powdered pectin.

Equipment Needed
- Cherry pitter: this tool makes it quick and easy to remove the cherry pits. If you don’t have a cherry pitter, a chopstick or metal straw will also do the trick (just push the chopstick or straw through the center of the cherry starting at the stem end).
- 6 sterilized half-pint mason jars and lids: this classic cherry jam recipe yields enough for about 6 (8-ounce) jars. I like the half-pint jars because it’s just the right amount of jam to keep in the fridge after it’s opened, but smaller 4-ounce jars are also a great option (you’ll need 12 of those).
- A sterilized funnel: this tool makes it easier to get the jam inside the jar without spilling; however, it’s fine if you don’t have a funnel — you can carefully spoon the jam into the jars instead.
- Tongs: canning tongs are incredibly helpful when taking the jars in and out of the hot water.
- Sharp knife: to chop the cherries. A food processor on the pulse setting will also work.
- Saucepan or Dutch oven: for cooking the jam. Allow plenty of room for the mixture to boil, bubble, and foam. I use my 7 1/4-quart cast iron Dutch oven.
- Wooden spoon or silicone spatula: to stir, stir, stir!
- Canner or large pot for boiling jars: this needs to be very deep so that you can cover the jars with at least 1-2 inches of water. I use the pot and rack from my pressure canner, but a deep stock pot also works fine.


How to Sterilize Jars and Lids
It’s a good practice to sterilize the jars and lids before canning in order to kill any bacteria, fungi, or yeast. There are a variety of ways to sterilize the jars (here’s a helpful article with different options). I typically use the dishwasher, or just boil them for 10 minutes in the same big pot of water that I’ll use for processing.

Directions
This is the classic Ball sweet cherry jam recipe, which I have been using for many years. We think the addition of almond extract is a delicious companion for the cherries; however, that variation is totally optional.
- Wash, remove the stems, and pit the cherries. Chop the cherries.
- Cook the cherries with the sugar, lemon juice, and almond extract (if using) until the sugar dissolves and the mixture comes to a full rolling boil. If you see big chunks of cherries, use a potato masher or a wooden spoon to break them up.
- Add the pectin and boil for exactly 1 more minute.
- Remove the pot from the heat and skim off the foam.
- Ladle the jam into hot jars. Remove air bubbles. Leave ¼-inch headspace in each jar. The proper amount of headspace is important to ensure a vacuum seal. If there’s too little headspace, the jam may expand and bubble out when air is being forced out from under the lid during processing.
- Wipe the rim of the jar clean and screw on the lid.
- Process the jars in a water bath for 10 minutes. If you don’t want to bother with canning the jars in a water bath canner, no problem! Just transfer the jam to jars, let them cool completely at room temperature, and then store in the refrigerator for up to 3 weeks.
- Let the jars sit and cool on the countertop for 12 hours.

How to Store
Once the jam has had a chance to cool, check the seals. The lids should be down in the center or should stay down when pressed. Unsealed jars or unprocessed jars of fresh cherry jam should be refrigerated and used within 3 weeks. Store properly sealed and processed jars of cherry jam in a cool, dark, dry place (such as a pantry) for up to 8 months. It’s a great way to hold onto the sweetness of cherry season!
I do not recommend freezing this homemade jam. Use a cherry freezer jam recipe if you prefer that method.

More Recipes with Cherries
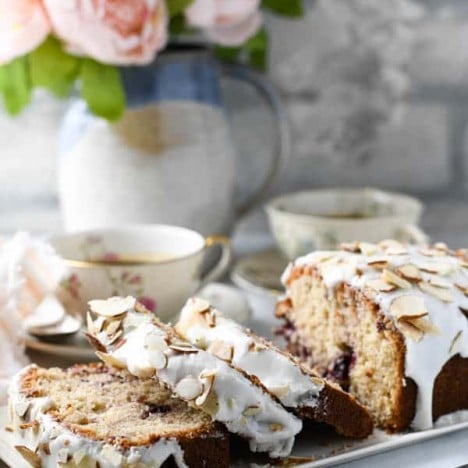
Almond Cherry Bread
3 hours hrs 10 minutes mins
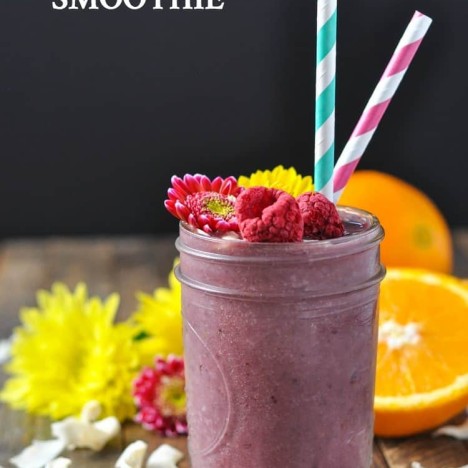
Southern Ambrosia Smoothie {Dairy Free & Vegan}
2 minutes mins
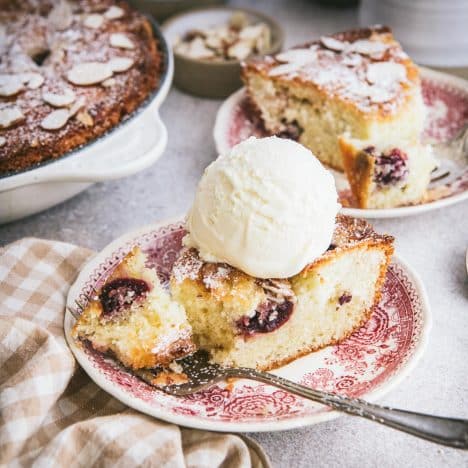
Cherry Almond Yogurt Cake
2 hours hrs 55 minutes mins

Cherry Jam Recipe
Equipment
- 6 half-pint mason jars with lids and bands (sterilized)
Ingredients
- 4 cups chopped, pitted sweet cherries (about 2 lbs.)
- 6 ¼ cups sugar
- 2 tablespoons lemon juice
- ¼ teaspoon almond extract, optional (or more to taste)
- 2 (3 ounce) pouches liquid pectin
Instructions
PREP
- Wash the cherries, remove the stems, and remove the pits. Coarsely chop the cherries. Measure out 4 cups of chopped cherries.


COOK
- In a large saucepan or Dutch oven over medium-high heat, bring the cherries, sugar, lemon juice, and almond extract (if using) to a boil, stirring until the sugar dissolves. Stir in the liquid pectin. Bring the mixture to a rolling boil that cannot be stirred down. Boil hard for exactly 1 minute, stirring constantly. Remove the pot from the heat; skim off any foam.

FILL
- Ladle the hot jam into hot sterilized jars, leaving ¼-inch of headspace at the top of each jar. Wipe the rims clean with a damp cloth, then secure the lids and bands so that the bands are fingertip-tight.

PROCESS
- Process half-pint jars in a water bath for 15 minutes. Make sure that the jars are covered by at least 1 inch of water.
- Carefully remove the jars to a towel on the counter. Let stand, undisturbed, for 12 hours at room temperature. Check the seals after 12 hours by pressing the center of the lids. If the lid gives or the center button remains popped up, store in the refrigerator for up to 1 month. Properly sealed jars will keep in a cool, dark place for up to 8 months. Refrigerate after opening.


Notes
- Recipe slightly adapted from Ball Guide to Preserving.
- If using sour cherries instead of sweet cherries, omit the lemon juice.
- It’s a good practice to sterilize the jars and lids before canning in order to kill any bacteria, fungi, or yeast. There are a variety of ways to sterilize the jars (here’s a helpful article with different options). I typically use the dishwasher, or just boil them for 10 minutes in the same big pot of water that I’ll use for processing.
Nutrition


I am surprised that the shelf life of sealed jars is only 8 months. Why is this?
Hi, Michele! That’s the recommendation I’ve read from some experts. That said, I think a lot of folks would tell you the properly canned jam is fine for at least 12 months. There’s definitely no hard and fast rule. Just use your best judgment, and if something looks or smells “off” or odd, then discard the jam. I’ve definitely had mine for longer than 8 months in the past without issue. Hope you enjoy the recipe!