Disclosure: This post may contain affiliate links. I may earn a small commission for my endorsement, recommendation, testimonial, and/or link to any products or services from this website.
A summertime classic, you just can’t beat a juicy, flavorful grilled burger recipe! With just 5 ingredients and a few minutes over a hot flame, grilling hamburgers is easier than you might think. Serve the restaurant-quality meal with a side of potato salad, baked potato wedges, pasta salad, or baked beans for an easy dinner that the whole family will love!

Table of Contents
For even more ground beef recipes, be sure to try this Big Mac salad with “special sauce” dressing, these cast iron skillet burgers, a pot of creamy tomato soup with ground beef and noodles, this Jiffy cornbread taco bake, and a bacon cheeseburger casserole with rice, too!
WOW!!!! Those were some great burgers! I served them yesterday for a picnic. They’re great.
– Gary
Thank you
What to Know Before You Get Started
- The best meat for grilled hamburgers is either “ground chuck” (80/20 mix) or “ground round” (85/15 mix). You need enough fat in the meat to keep the burgers juicy, but not too much that it causes flare-ups on the grill. Using leaner meat (such as a 90/10 mix like “ground sirloin”) yields a dry hamburger, so if that’s all that you have on hand, you’ll want to add some fat to the mix (such as olive oil or bacon). You can also swap out the ground beef for ground turkey or ground chicken. Just make sure that you’re using turkey or chicken with a decent amount of fat (not 99% lean turkey breast, for example).
- The Worcestershire sauce is a key “secret ingredient” that adds salty, umami flavor. Feel free to try different seasonings as well. For instance, you might like to season the meat with this all-purpose house seasoning blend, with a bbq rub, or with garlic powder or onion powder.
- Be gentle when combining your ingredients and shaping your patties. Don’t over-mix the meat or you may end up with a dry, dense burger.
- Keep the meat cold. Shape the patties quickly, and then give them time to chill in the refrigerator before cooking. If the meat gets too warm while you’re forming the patties, the fat may melt and smear. This causes the fat to separate from the lean meat, so that more fat drips off during the cooking process and yields a dry, dense burger. The chilling time also helps the meat hold together so that your patties don’t fall apart on the grill (since we’re not using any binders like egg or bread crumbs).
Directions
This easy recipe shows you how to grill hamburgers step-by-step so that they’re perfect every time!
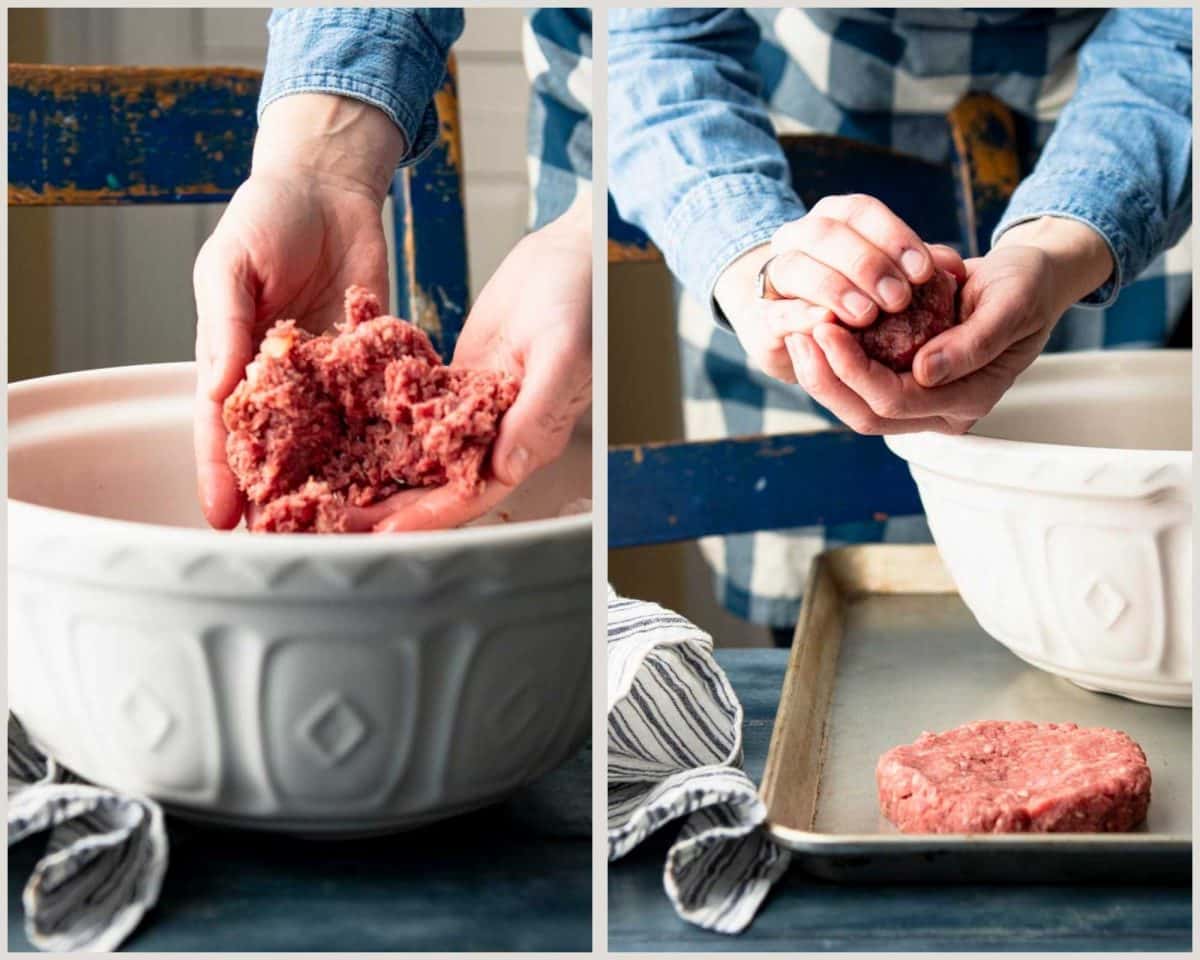
- Combine. In a large bowl, use your fingers or a fork to gently combine the ground beef, diced onion, Worcestershire sauce, salt and pepper. Season the meat before you form the patties and grill the burgers to ensure that your hamburgers are evenly seasoned all the way through — rather than just sprinkling some salt on top at the end.
- Shape. Divide the meat into 6 equal portions. Use cupped hands to gently toss one portion of meat into the shape of a loose ball. Flatten into a 1-inch patty, pressing a small dimple in the middle. This small indentation will prevent the burgers from “puffing up” during grilling. Repeat with remaining beef to shape 5 more patties.
- Chill. Place the patties on a tray that has been lined with wax paper or parchment paper. Cover loosely with plastic wrap and refrigerate for at least 1 hour.
- Grill. Cook the hamburgers on a propane gas grill, indoor grill pan, or griddle or cast iron skillet on the stove over high heat for about 3-4 minutes per side (or see the chart below for more specific cooking times). Flip carefully and don’t press down as the burgers cook! It might be tempting, but pushing down just squeezes out the fat that you want to keep inside for juicy, flavorful hamburgers.
- Allow the Burgers to Rest. This gives the juices time to redistribute for a nice, juicy burger!
- Toast the hamburger buns. Slice the buns in half, slather them with butter, and toast them in a toaster oven, on a griddle, or on the back of the grill away from the direct heat. Serve the patties on the buns and finish with your favorite toppings.

Hamburger Grill Time Chart
Make sure that you preheat your propane gas grill or indoor grill pan to “HIGH” heat, which should be a temperature of 450°F – 500°F. Here’s a handy time chart that I created to help you gauge the general cooking time for your perfect hamburger. Of course, these times are only estimates. The total time for grilling hamburgers varies depending on the temperature of the grill and the thickness of the patties.
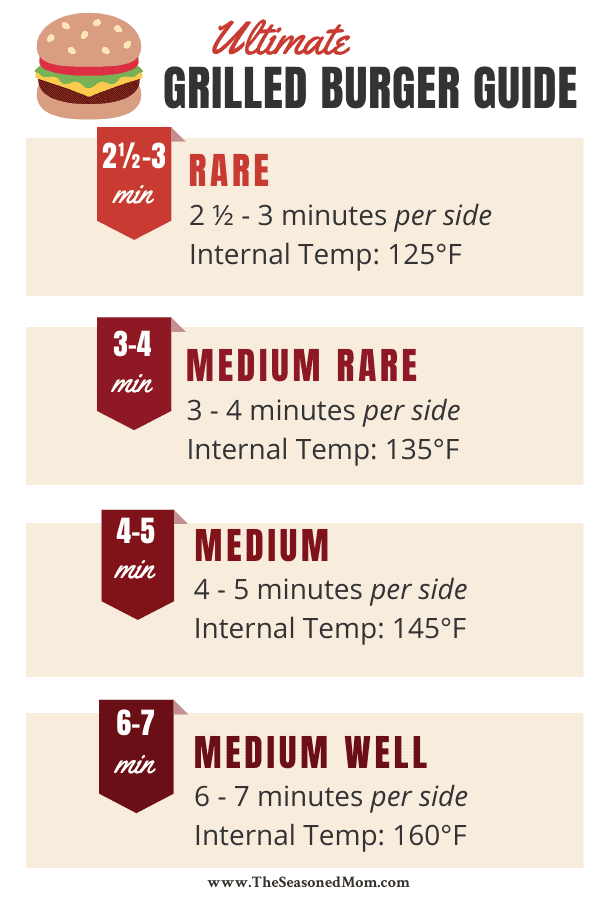
Please note that the USDA recommends cooking ground meats to an internal temperature of 160°F, which is well-done without any pink in the center. If you prefer a more rare burger (such as medium or medium-rare burgers), consume at your own risk. And as always, an instant-read meat thermometer is the best way to know when your grilled hamburgers have reached your preferred temperature.
Serving Suggestions
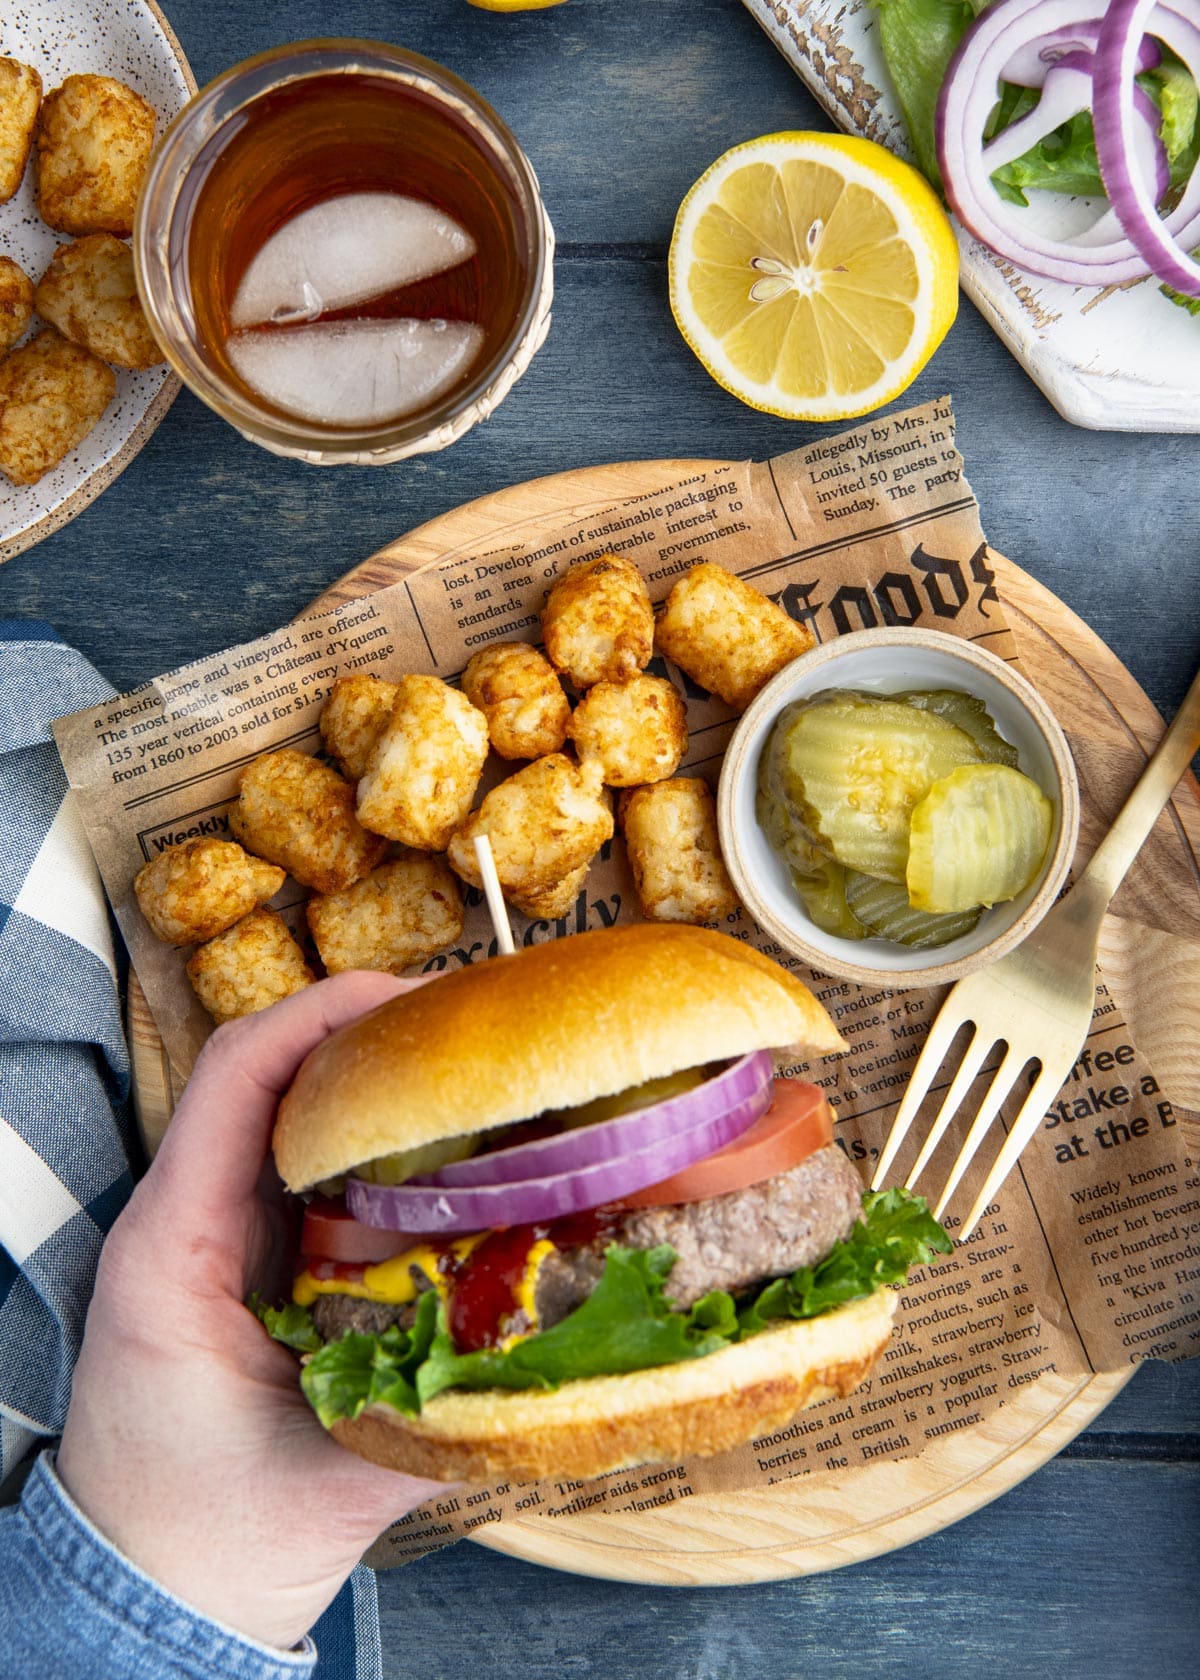
Pile your grilled hamburgers high with any of your favorite toppings! Good burger toppings include ketchup, mustard, bbq sauce, mayo, pickles, sliced red onions, grilled pineapple, caramelized onions, sautéed mushrooms, American cheese (for a classic cheeseburger), Swiss cheese, cheddar cheese, crispy fried bacon, lettuce, sliced tomato, guacamole or sliced avocado. Try adding fried green tomatoes and pimento cheese for a Southern burger!
On the side, pair the grilled burgers with any of your favorite picnic sides like Southern macaroni salad, Southern potato salad, calico beans, corn on the cob in the oven, traditional coleslaw, homemade baked beans from scratch, a classic pasta salad, and an easy fruit salad with vanilla pudding.

Preparation and Storage Tips
- Make Ahead: Prepare the patties up to 24 hours in advance. Keep covered in the refrigerator until ready to grill.
- To Freeze Raw Hamburger Patties: Place in a single layer in a freezer bag (separated by parchment paper if you plan to stack them). The frozen patties will last in the freezer for up to 3 months. When ready to use you can thaw the patties in the refrigerator overnight, or grill them frozen — just add a few extra minutes of cooking time and use your meat thermometer to make sure that the hamburgers reach your desired temperature.
- To Store Grilled Hamburgers: When tightly-wrapped, leftovers will last in the refrigerator for 3-4 days or in the freezer for up to 3 months.
- To Reheat: Place the burgers on a baking sheet in a 350°F oven and warm just until heated through (this will only take a few minutes if the patties are at room temperature). You can also warm individual patties in the microwave for about 1 minute.

Fabulous! Just the right amount of seasoning. Pressing the dimple into the patties so that they don’t puff up – brilliant! 4 minutes each side with no pressing on the patties yields a nice, juicy, tasty burger. These freeze well and cook up into a delicious summer burger. Yum, yum!!!
– Grace
More Grilling Favorites
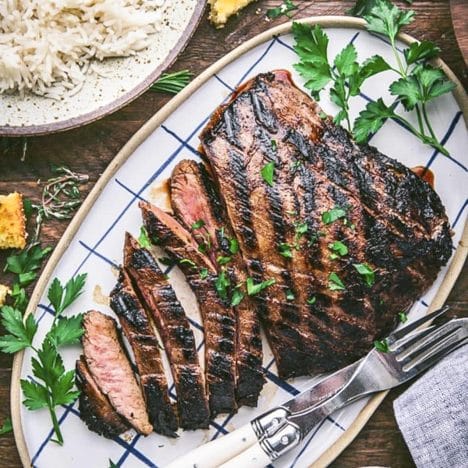
Flank Steak Marinade
2 hours hrs 20 minutes mins

Grilled Salmon
15 minutes mins

BBQ Chicken Breast
25 minutes mins

The Best Grilled Burger Recipe
Ingredients
- 2 lbs. ground beef (80/20 mix or 85/15 mix)
- ¼ cup finely diced onion
- 2 teaspoons Worcestershire sauce
- 1 ½ teaspoons kosher salt
- ¼ teaspoon pepper
- Optional, for serving: sesame seed or brioche buns and other toppings
Instructions
- Place all ingredients in a large bowl. Use a fork (or your fingers) to gently, evenly distribute the seasonings. Be careful that you don’t overwork the meat, which can result in a dry, dense burger.

- Divide the mixture into 6 equal portions. Use cupped hands to gently toss one portion of meat into the shape of a loose ball. Flatten into a 1-inch patty, pressing a small dimple in the middle. This small indentation will prevent the burgers from “puffing up” during cooking. Repeat with remaining beef to shape 5 more patties. Place the patties on a tray that has been lined with wax paper or parchment paper. Cover loosely with plastic wrap and refrigerate for at least 1 hour.
- Heat a gas grill or grill pan on high (about 450-500°F). Oil the cooking grate and cook until burgers are lightly charred on each side (about 3-4 minutes per side). The total cooking time will depend on the temperature of your grill and the thickness of your patties. Serve on buns with your favorite toppings.


Notes
- Keep the Meat Cold: Shape the patties quickly, and then give them time to chill in the refrigerator before cooking. If the meat gets too warm while you’re forming the patties, the fat may melt and smear. This causes the fat to separate from the lean meat, so that more fat drips off during the cooking process and yields a dry, dense burger. The chilling time also helps the meat hold together so that your patties don’t fall apart on the grill (since we’re not using any binders like egg or bread crumbs).
- Don’t Over-Mix: Be gentle when combining your ingredients and shaping your patties. Over-mixing the meat will yield a dry, dense burger.
- Toast the hamburger buns. This is personal preference, but a toasted bun is a nice finishing touch. Slice the buns in half, slather them with butter, and toast them in a toaster oven, on a griddle, or on the back of the grill away from the direct heat.
- Double the ingredients to make 12 patties, or cut the ingredients in half for just 3 patties.
Nutrition
This recipe was originally published in July, 2020. It was updated in June, 2024.


The burgers turned out great!!! Great tips!
Thank you, Chris!
Fabulous! Just the right amount of seasoning. Pressing the dimple into the patties so that they don’t puff up – brilliant! 4 minutes each side with no pressing on the patties yields a nice, juicy, tasty burger. These freeze well and cook up into a delicious summer burger. Yum, yum!!!
Thank you so much, Grace! We’re so glad you enjoyed it.
WOW!!!! Those were some great burgers! I served them yesterday for a picnic. They’re great.
Thank you
Wonderful! I’m so glad to hear that. Thank you, Gary! They’re on our menu for tonight. 🙂
All the tips were very helpful, like not having to add egg & bread crumbs. Turned out better than any other burger recipes I’ve followed in the past.
We’re so happy to hear this, Linda! Thank you for trying it out.